If you’re reading this, then most likely you’ve reached the point in your crypto journey where the coin you want to buy isn’t available on a traditional exchange (Binance, Coinbase, Kraken.) So where can you find such tokens? This article will not only answer that question for you but also walk you through how to use a decentralized exchange so you know exactly what you need to do.
Centralized Exchanges
You started here, a centralized exchange. Binance, Kraken, Coinbase are all examples of a centralized exchange. The reason they are called centralized is that one person or company controls it and manages the assets in it. This is great because you get a more familiar experience when you’re getting started. Centralized exchanges are set up similar to any traditional brokerage account like Charles Schwab or Ameritrade.
The downside is that you can only trade in the currencies they decide to add to their platform. This means that if you’re looking for a hot new coin that just launched recently, good luck. While centralized exchanges do try to add as many coins to their platform as possible, they simply can’t keep up.
Introducing Decentralized Exchanges
So if you can’t get your coin on the central exchange, where can you get it? From something called a decentralized exchange, commonly referred to as a DEX or SWAP. As the name suggests, they are special sites that allow you to swap (exchange) one coin for another. A popular one is pancakeswap.finance which is operated by Binance.
The downside to use a decentralized exchange is that you have to swap coins of a kind. So if the crypto you want is based on Ethereum, then you will need to swap another Ethereum based coin. For Pancakeswap, you will need to exchange a Binance Smart Chain (BSC) based currency.
Benefits Of A DEX
How are DEXs different from a centralized exchange and how are they beneficial? Unlike a centralized exchange, when you use a decentralized exchange new tokens on the exchange can be added by anyone. The only requirement to doing so is that liquidity in that coin is also provided. Liquidity and how it works on exchanges is beyond the scope of this article but the general concept is this: If you add a new coin you created to an exchange, you also provide a few hundred million of the coin to the same exchange so that there is something there for others to exchange with.
There is no centralized party that reviews these, so new or more specialized coins can be added quickly. As long as you can supply coins to use for exchanges, you can add the coin.
What DEXs Are There?
Quite a few, but the real question is, what dex holds the coin you are looking for? The first important thing you’ll want to know is what base chain your coin is utilizing. You can find this information on the website of the project you are interested in. Here are some examples of big DEXs that exist, the native swap currency (the currency considered the official coin of the swap) and their associated chain.
- WagyuSwap (WAG) – Velas Chain (VLX)
- UniSwap (UNI) – Ethereum Chain (ETH)
- PancakeSwap (CAKE) – Binance Smart Chain (BNB)
A Note On Wallets
Before you use a decentralized exchange, it’s important to know what crypto wallet to use. DEXs require using what is called a Web3 Wallet. A Web3 wallet is, simply put, a wallet that allows the owner to conduct transactions on decentralized finance applications (dApps) and the decentralized web. (read this great article by Brave for a more in-depth explanation of the decentralized web, and how it differs from the web as it stands today.)
You will need a Web3 wallet to us a decentralized exchange like the ones listed above. You should do your own research on the various ones available and pick one that best suits your needs. A quick recommendation to get started is Metamask. It is popular and a widely accepted option. Another option is Trust Wallet.
A word of caution on Web3 wallets, you are the custodian of your money. A bank can reverse transactions made in error, and a centralized exchange has insurance to recoup lost funds from hacking. This is not so with Web3 wallets.
Hardware Wallet
I would be remiss as a crypto enthusiast if I did not mention hardware wallet solutions like Ledger, and Trezor. In the crypto space, the most secure you can be with your crypto is with a hardware wallet. The only problem is many are still lacking Web3 accessibility. At the time of this writing, Keystone and Ledger are the only two capable of this.
Not your keys, not your crypto.
A common saying in crypto you’ll often hear is, “Not your keys, not your crypto.” It’s both a warning and a rallying cry of empowerment on having full control of your money and finances. Should you forget your password, lose your mnemonic phrase, send money to the wrong address, etc. your money will be lost forever. There is no undo.
The great part is, no one can put a hold on your funds, no one can garnish deposits. It can’t be placed in a hold. It’s 100% yours.
When you create a new web3 wallet make sure to write everything down and keep it in a safe place. You can add this information to a password manager if you feel you must have an online solution, but storing this info online is heavily discouraged as it becomes subject to potential hacking.
Moving Your Money Off Of Centralized Exchanges
Now let’s move your money off the centralized exchange, into a Web3 wallet, and connected to a DEX so you can get access to new coins.
Step 1 – Make a deposit to a CEX
The best and cheapest way to get money into the crypto market is via a centralized exchange. For this example, we will assume you are using Bainance.us. Make your deposit into the exchange using your preferred method. Remember that purchases with money from ACH transfers and debit card transactions are not allowed to be withdrawn until the transaction clears or up to 10 days.
Step 2 – Buy the appropriate base coin
As mentioned earlier, most coins are a derivative of an existing network (Ethereum, Binance Smart Chain, etc.) Purchase a coin from the exchange that utilizes the same base chain as the DEX you use will use for the swap. Take care to confirm that the decentralized exchange does indeed accept the coin as a swappable option.
Let’s assume in this case the coin you want to purchase is BYG. BYG is a coin based on the Binance Smart Chain (you can find this info on the coin website and on coinmarketcap.com or CoinGecko.com) The DEX that makes the most sense here is PancakeSwap as it is built on the Binance Smart Chain. (Note: If in doubt, check the project website for recommended exchanges to purchase the currency.)
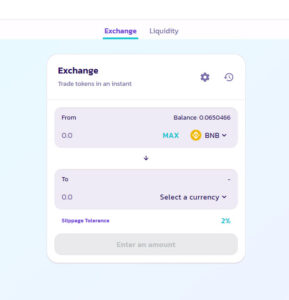
When you visit Pancakeswap you will notice it defaults to BNB, this is our biggest clue as to which currency we should purchase on a centralized exchange. You can, however, select from any of the currencies in the drop-down.
Step 3 – Purchase base currency and transfer it to your wallet
Now that you know which currency you need to exchange for the one you want, the next step is to purchase it and then transfer it into your Web3 compatible wallet.
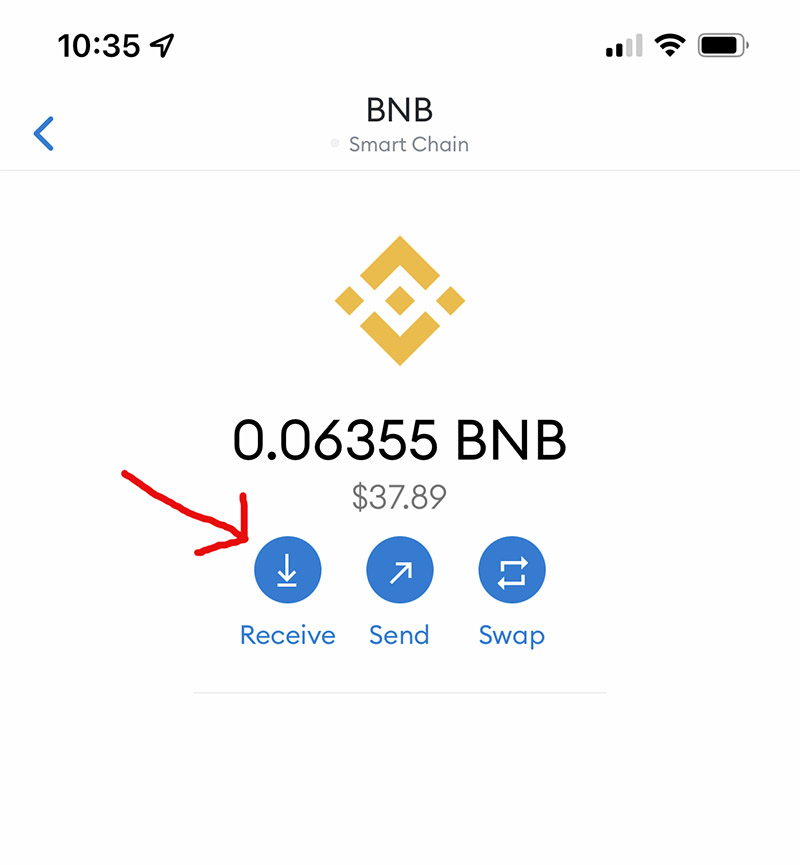
This step may seem scary, and it can be, but as long as you don’t rush, it is quite simple. I will assume here you are using Metamask, but the process will be the same regardless of what crypto wallet you are using. First into your wallet and find the currency you intend to receive.
In this example here, we want to receive BNB, so you will select BNB and then select the receive option.
This will open a screen that will contain a QR code as well as a text field with some random appearing characters. These characters are the address of your BNB wallet. It is the information others will need to send you BNB.
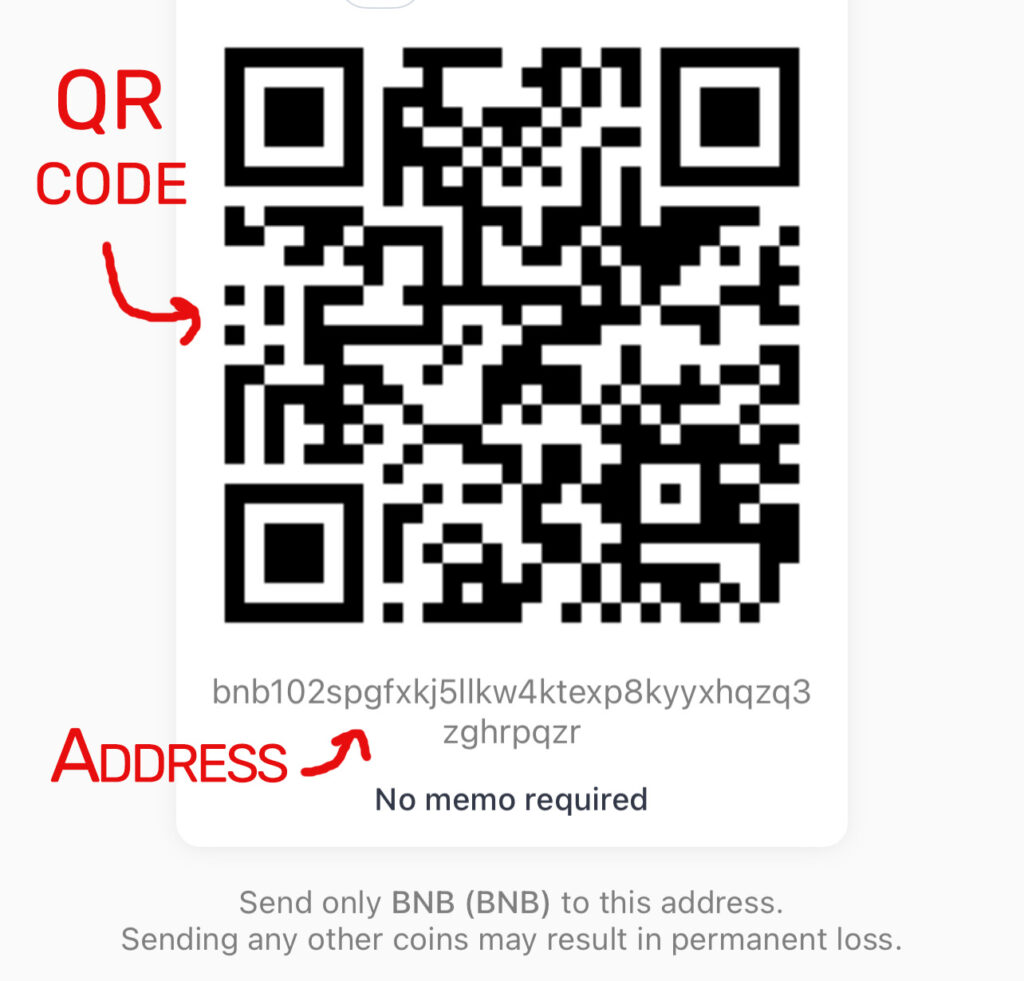
Copy this address and when you select the withdraw option from Binance, you will paste it into the recipient address field provided. If you are sending the money between your computer and phone, you can utilize the QR code scanner to populate the field.
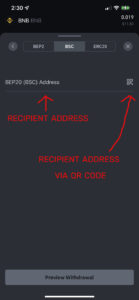
There is a fee for sending money between exchanges, wallets, and swapping coins. These fees are only a few cents and are paid for in the base currency being transacted on (ie. A coin on the BSC chain would be charged fees in BNB, etc.) So remember to set aside some money for this.
Ethereum is a special case, fees can be north of $50. For everything else, setting aside a dollar should cover you for multiple transactions. Be sure to check over all the transaction details before you confirm them.
Making The Swap
Congratulations! You are now set up to use a decentralized exchange.
Step 1 – Visit the appropriate DEX
Per our example, this will be Pancakeswap.finance/swap
Step 2 – Connect your wallet.
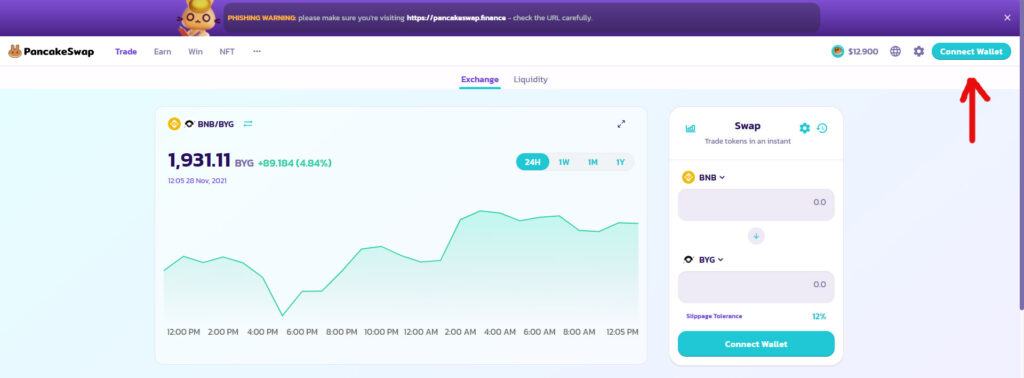
On your first time utilizing an exchange, you will need to connect your wallet. This option is available at the top right of the page will authorize the DEX to make transactions with the connected wallet. Don’t worry too much about this, any requested transactions must be approved via Metamask first. You can also unauthorize a connection at any time.
Step 3 – Select your trading pair
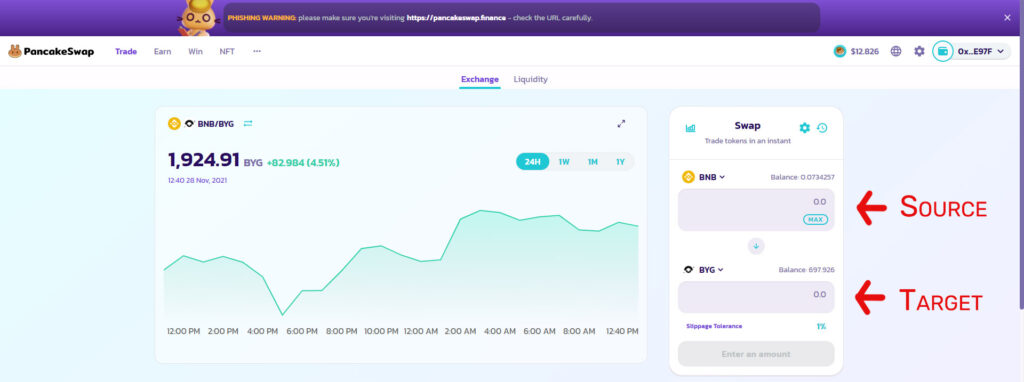
Once your wallet is connected, you will select your trading pair. Select BNB for this. For the coin being converted to, you can either search for it (pressing the drop-down will open a search option) or if you’re trading a relatively new or small coin, you may need to enter what is called the contract address yourself. The contract address is the term used to refer to the identification characters of the coin.
The contract address can be found in a few places. It will always be available from the project’s webpage, and can also be found on coinmarketcap.com and coingecko.com.
Here is the actual contract for BYG for reference on what it looks like:
0x4f7b627b88651e3dddca0240bca68a3062632c8c
Step 4 – Input exchange amounts
Enter in how much of the source currency you wish to spend, and the amount of target currency you will receive will auto-populate.
Step 5 – Confirm the swap
The final step is to confirm the swap. You will receive an approval popup from Metamask, and assuming you have the required fee on hand, the transaction will process. You should see your new coin in your wallet after a minute or two.
Final Thoughts
Once you’ve done this a few times, these steps will come naturally. You’ll identify a coin you’re interested in and immediately have an idea where you will be able to go to find it. When first starting out, however, it is confusing and can seem daunting. The first time I stumbled my way through it I, unfortunately, made a costly mistake. Hopefully, this helps you through the process so that your own experience is relatively uneventful and you can go about enjoying your new purchase!
Are you interested in joining a community of like-minded individuals where you can ask questions and get help in the crypto space? Join us in the Monumental Expansion group on Discord, completely free.

